Testing
Follow the installation steps above to have the application ready, then add these steps for developing code.
Making Your System an SNMP Server
Switchmap uses SNMP to gather data from network devices. As a developer it may be difficult to get access to test equipment. This section outlines how to run SNMP on your local machine as an SNMP server.
- When the server is running and correctly configured, it will provide data about its interfaces via SNMP.
- You'll need to use an SNMP client to extract the data from the server.
Here are some links to get you started:
- Windows 11:
- SNMP Server:
- Setting up the Server: Enable SNMP on Windows
- SNMP Client:
- Software: Net-SNMP Download
- Tutorial: SNMP Walk Examples for Windows
- SNMP Server:
- Ubuntu:
- This page includes both server and client setup.
- Ubuntu SNMP Setup Guide
SwitchMap-NG Setup for Developers
Follow the installation steps above to have the application ready, then add these steps for developing code.
Database Configuration
Create the switchmap_unittest database, and grant privileges to a
switchmap_unittest user with the password switchmap_unittest.
$ sudo mysql
CREATE DATABASE switchmap_unittest;
GRANT ALL PRIVILEGES ON switchmap_unittest.* TO 'switchmap_unittest'@'localhost' IDENTIFIED BY 'switchmap_unittest';
FLUSH PRIVILEGES;
EXIT;
Setup the Test Config File
Create the testing configuration file which will be stored in a hidden
directory in $HOME
(venv) $ tests/bin/test_db_config_setup.py
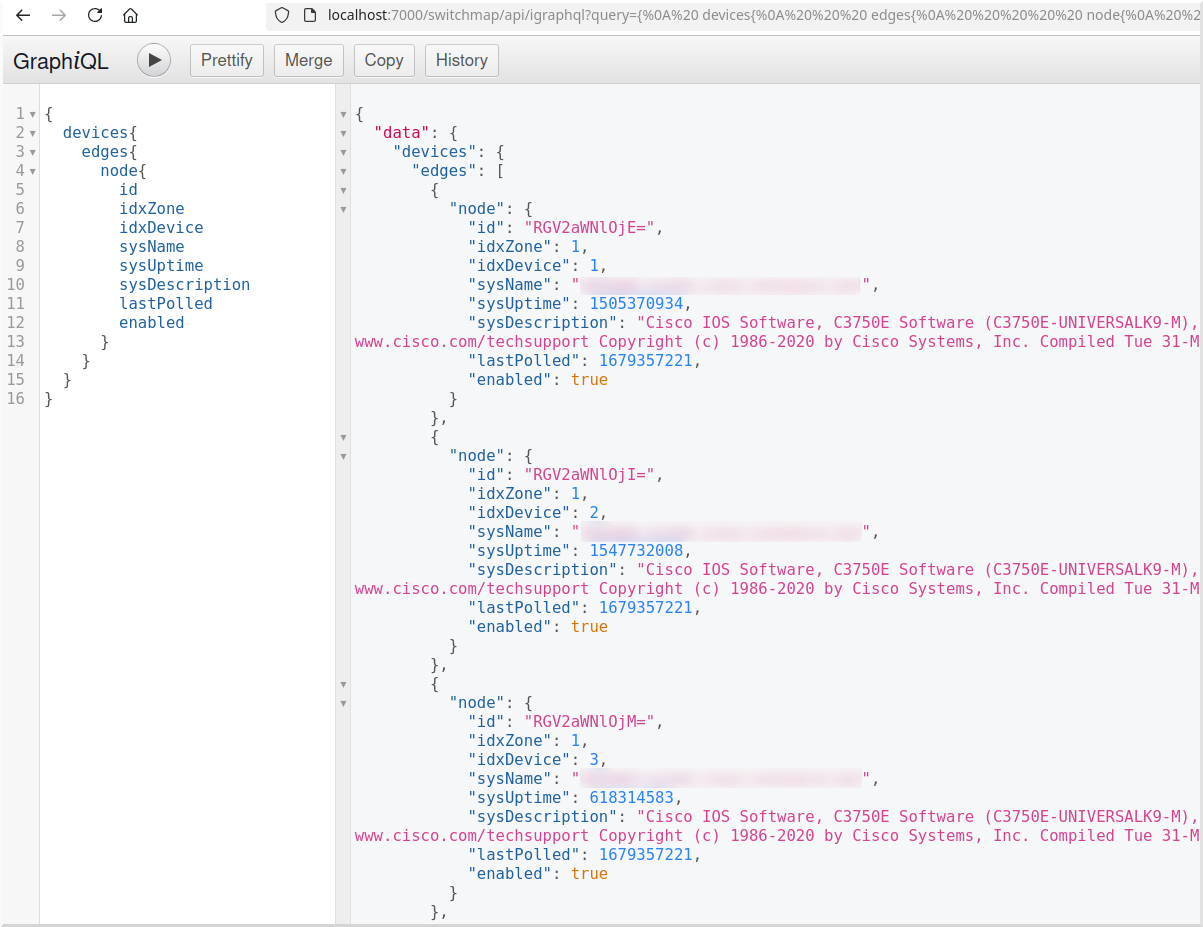
API Interactive GraphQL Interaction
This is useful for:
- Developing queries for API clients.
- Troubleshooting your code.
- Creating new features.
On the API server you'll be able to make GraphQL queries in an easy to use interactive web page.
- Enter your query in the left hand panel
- Press the
Playbutton - Observe the results
Interactive GraphQL URL
The URL on a running on your local server is:
http://localhost:7000/switchmap/api/igraphql
Interactive GraphQL Screenshot
Here is a sample of what to you can do with interactive queries.
Important File Locations
These locations are important for developers:
Module Library Layout
Modules are arranged like this:
- The API modules are located in
switchmap/server - The Poller modules are located in
switchmap/poller - The Web UI modules are located in
switchmap/dashboard - Modules that are shared with all three are located in
switchmap/core
Database and GraphQL
Reviewing these files will be important.
- The Database SQLAlchemy ORM definitions can be found in the
switchmap/server/db/models.pyfile. - The GraphQL schema are located in the
switchmap/server/db/schema.pyfile. - The GraphQL schema attributes are located in the
switchmap/server/db/attributes.pyfile.
Run the Test Suite
NOTE: The test cases are written to be run only from the root directory of the repository this to ensure no errors in importing both the required test and code modules.
You can run all the tests with this command.
(venv) $ cd /path/to/switchmap
(venv) $ tests/bin/_do_all_tests.py
An alternative method is to use pytest.
(venv) $ cd /path/to/switchmap
(venv) $ pytest tests/switchmap_
You can run individual tests with this command.
(venv) $ cd /path/to/switchmap
(venv) $ tests/switchmap_/path/to/test.py
Populating the Database Using the Ingester
Pollers post network data to the Switchmap-NG server. The Ingester process reads this posted data and uses it to update the database.
You may not have access to network devices for testing, however there is test data data that can be imported using the ingester.
An easy way to populate the database using this data is to:
- Configure switchmap
- Copy the test files in
tests/testdata_to the configurecache_directory - Start or restart the poller daemon or app
- The updated data should now be visible in the web UI